-->

Monday, November 3, 2014

Analyze Character with White Board Mirrors

I've been dealing with every teacher's worst nightmare: a prolonged leave of absence. After an unexpected illness had me benched for almost two weeks, I was devastated that my honors students were studying and performing Arthur Miller's The Crucible without me. Being a theater geek myself, drama is one of my favorite things to teach in the entire world, and sitting at home trying to rest while I knew my students were studying the play without me was tantamount to sucking on under-ripe lemons while cleaning baseboards with a Q-tip.

Have I mentioned how awesome my students are?
Here's one of my ridiculously creative
get-well presents from an eleventh grader.
Luckily, I managed to secure a fantastic substitute, but I was still worried about how I would manage to review two weeks' worth of learning in a single class period upon my return. In the dramatic form, characters take center stage (literally), so I decided to do a huge character carousel with a twist.

In this activity, which can take anywhere from 30-45 minutes, the students treat white boards as mirrors, drawing portraits of their assigned character that show how the character views him or herself. Students use symbols in the creation of their portrait to show the characters' values, beliefs, personality, motivations, and relationships. Once again, a great deal of analysis and interpretation goes into this activity, while students just feel like they're drawing a picture. Teacher win.

Lesson Objectives

Through this lesson, students will be able to:
  • Analyze characterization and character motives, values, and beliefs
  • Create working symbolism to represent character traits
  • Use public speaking skills to present and defend their interpretation


Materials

For this lesson, you will need:
  • White boards
  • Markers
  • Small sticky notes


Core Standards

CCSS.ELA-LITERACY.RL.11-12.3
Analyze the impact of the author's choices regarding how to develop and relate elements of a story or drama (e.g., where a story is set, how the action is ordered, how the characters are introduced and developed).


Background Knowledge

Your students will need a healthy working knowledge of characterization (especially being able to analyze and explain personality traits, values, beliefs, motivations, and relationships with other characters). They should also know enough about symbolism to use and create their own to describe the character.


Procedures

The following steps should take about one class period of 45 minutes:
  1. Put the students into groups of 2 or 3.
  2. While one student is sent to gather materials (one white board and marker per group), assign the rest of the group members a character from the text you are studying-- the more complex, the better.
  3. Students have 5 minutes to draw their character on their white board, using symbols to show the character's motivation, personality, beliefs, values, or relationships.
  4. The teacher will pass out sticky notes-- one per board-- as the students finalize their character drawings.
  5. The students should clean up their area and leave their board at their station. Then, they will all stand up and find a new table and a new partner.
  6. At this new station, students will attempt to interpret the symbols chosen and analyze how they portray the chosen character. They will write a few notes about their interpretation on their sticky note and attach it to the white board.
  7. If you have time, the students should rotate to a new board once more and try to add to or contest the interpretation of the previous group on a new sticky note.
  8. The students should go back to their original board and read the sticky notes that have been left behind. They should take one minute to prepare to present their portrait, taking into account what other groups saw in their symbols.
  9. The students take turns presenting their portraits, explaining the meaning of their symbols and the motivation behind each character's behavior.
  10. Students (and the teacher) should add to the interpretation, suggesting ideas for improving or adding to the portrait.

Examples

Here are a few examples from my own students, using characters from Arthur Miller's play The Crucible. These are their interpretations, as closely as I can remember them:

Students' interpretation of Abigail Williams

ABIGAIL WILLIAMS

The young woman who begins the accusations of witchcraft in Salem.

  • cloud - represents her lack of perception and altered way of viewing reality
  • brain - shows that she is arrogant and self-obsessed, acting out of self-interest
  • eyes - John Proctor's face stands in for her pupils, showing that she only has eyes for Proctor, which drives her behavior in the play
  • mouth - large and filled with "stuff," as they say-- showing that she speaks out for attention, saying whatever she must, despite its untruthfulness
  • ears - smaller than average, showing that she is incapable of listening to others
  • birds - show the panic that she has caused in the town


White board mirror for Reverend Parris

REVEREND PARRIS
The town's pastor, whose daughter is first afflicted by witchcraft.

  • eyes - he only sees, and therefore seeks, power for himself
  • mouth - he is always crying "Devil" in order to whip the parish into a frenzy, helping to secure his position as minister
  • man on shoulder - always concerned for his own preservation
  • heart - driven by a desire for material wealth
  • cross necklace and collar - he is the town's pastor and is concerned with religious practice, though the conflict with the other symbols shows that he is not truly a man of conscience
  • teddy bear - he is protective of his daughter

I'd love to hear how it goes if you use this lesson in your own classroom. It's flexible enough to work with any novel, play, or short story that has a wide range of characters-- and it's fun. Enjoy!

Tuesday, October 28, 2014

Learning Centers in High School English?!

Learning centers are all the rage in elementary school these days-- just ask my husband, the fabulously talented Mr. First Grade, whose centers are practically famous, from professional development workshops to the far reaches of the inter-webs. Yet you almost never hear about centers making their way into the high school classroom-- unsurprising, as it can be difficult to cram multiple activities into a 45-minute block. However, I've always been intrigued by the idea of centers because English teachers at the high school level do have to juggle so many different skills--reading, writing, speaking, and listening, not to mention vocabulary development. I find myself intimidated by the legwork needed to get these things off the ground and the independence required of students, but I'm a constructivist and I have faith in the darling minds of the next generation, so off I go.

Preparing for Centers

Before trying to run centers, I think it's important to do some preparation:

  1. Build comfort and confidence with the activities you want to use in your centers through teacher modeling, whole class guided practice, and pair-share.

  2. Find a way to arrange your classroom so that each center lends itself to collaboration and independence (grouped desks in triangles or circles makes sense to me). The stations should be far enough away to avoid distraction but close enough that you can monitor what's happening in the other groups.

  3. Make the activities in the beginning stages very transparent and require accountability-- instead of just practicing with a vocabulary game, for example, find a partner vocabulary activity that requires a written transcript (such as a "round robin" vocabulary story where students pass off a piece of paper and each write a new sentence with one vocabulary word in it).

  4. Find a way to show students the time so they know exactly what they need to accomplish. It could be as simple as writing the time for each round on the board (and putting a student in charge of ringing a bell or announcing the rotation), or as high-tech as projecting a timer onto the white board (if you type "timer" into Google, it will pop up automatically).
A screenshot of Google's Timer app

Diving headfirst into centers without some planning could be disastrous, so the prep time is worth it in the end. Remember that students need to practice running these centers, and that the more comfortable they grow, the more independence you'll start to see. Allow your expectations to be flexible in the beginning and have patience!

Sample Centers for Fahrenheit 451

For my first shot at centers, I had the students working on three things:
Free vocabulary story template
  • Vocabulary station - Students write a partner (or small group) vocabulary story, one sentence at a time, passing the same paper around to continue the narrative.
    • Click on the worksheet to the right to download my free template!
  • Close reading station - Students take turns reading a paragraph or two of the next section of Fahrenheit 451, pausing to answer close reading questions together.
  • Discussion group station - Students meet with the teacher in a small group to discuss higher-order analysis questions related to yesterday's reading, using the texts as evidence.

With a little bit of planning, centers can help you to give your students the individual attention they need while helping you incorporate a variety of skills into one lesson. Getting your students up and moving is a great way to keep them focused and engaged throughout the period.

Do you think you'll ever try centers in your high school classroom? What are some of your concerns going into it? Drop a line in the comments!

Monday, October 27, 2014

Mapping the Plot: Moving Conflict Pyramid

I consider myself something of a boss when it comes to creating worksheets. In fact, I'm known by many as the Formatting Ninja. My fonts are always beautifully selected, my images well chosen, and my layout impeccable. (It gets annoying, actually-- just ask my husband about the last time I criticized a store's logo for using an ugly font... oh, right, yesterday). I really should have gone into publishing, but I can't sit still for that long.

Don't get me wrong-- I think worksheets are generally overdone, and the sometimes trivial mental work that is required by a poorly constructed worksheet gives the whole format a bad name. Worksheets are great as long as they're well constructed. My students probably have enough paper in their binders to construct another ark by the time they finish my class. But sometimes, you just need to break away from the worksheet wagon and get them out of their seats, collaborating, and creating. This is where a the living conflict pyramid comes in!


Lesson Objectives:

  1. Identify the main conflict of a story
  2. Analyze and chart the development of the main conflict
  3. Visualize pivotal scenes in the story
  4. Create a plot pyramid a la Freytag
  5. Collaborate and negotiate 
  6. Present their findings orally and defend them

Materials:

For this activity, you will need:
  • White boards
  • Dry-erase markers
If you don't have those, you could easily substitute construction or regular paper and markers!

Core standards:

CC.1.3.11–12.E: Evaluate the structure of texts, including how specific sentences, paragraphs, and larger portions of the texts relate to each other and the whole.

Background Knowledge:

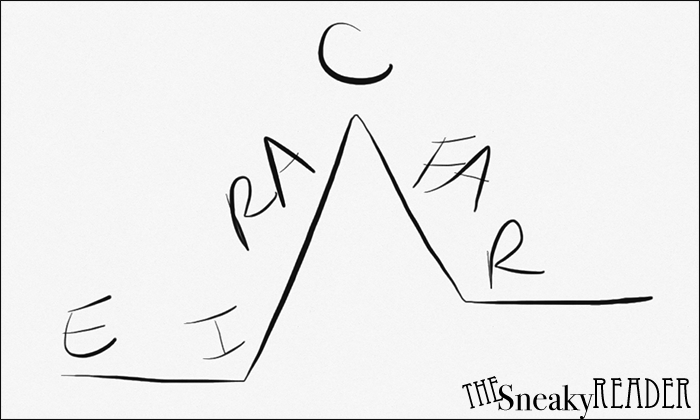
We teach our students to analyze plot structure by understanding the CONFLICT. We teach Freytag's pyramid like so:


Each letter represents a certain point in the conflict:
  • Exposition - Background information leading up to the conflict
  • Inciting Incident - Technically, this one isn't in our curriculum, but it always helps my students to understand the plot better. This is the moment or event that ignites the conflict
  • Rising Action - Events that develop or worsen the conflict
  • Climax - Point of greatest uncertainty, when we are unsure how the conflict will resolve
  • Falling Action - Events that start to show us how the conflict will resolve
  • Resolution - The conflict ends or resolves (or does it?)

Procedures:

The first step is for students to get into a group of about 5 or 6. In their groups, they must accomplish the following:
  1. Determine the main conflict of the story (in Fahrenheit 451, it could be Montag's rebellion against conformity)
  2. Decide which 5 or 6 scenes are the most important to developing that conflict
  3. Draw each of these scenes on a white board, paying attention to the characters and how they are portrayed in relation to each other
  4. Decide how to arrange their boards in terms of the conflict-- the higher the board, the greater the sense of conflict
  5. Identify the points of the plot pyramid associated with each scene and prepare to explain and defend each one
Give the students about ten minutes to prepare. Then, they should go to the front of the room and stand in their living pyramid with their white boards held up in varying degrees of conflict (the higher the board, the stronger the conflict). They should explain and defend their positions and allow their classmates to ask them questions and challenge their interpretation.


Your students will just think they're having fun drawing on white boards, but really, they're doing a great deal of higher-order negotiating, prioritizing, and analyzing in order to create this living plot pyramid. Happy plotting!